Getting Started with Harmony Home Hub Extender
This setup tutorial will guide you through connecting home control devices such as lights, locks, plugs and sensors to your Harmony remote. You can create helpful rules such as closing the blinds if a particular window casts too much glaire on your TV, or brightening your bedroom lights every morning at sunrise.
Connecting Home Hub Extender
Harmony Home Hub Extender is only available in the United States.
- You've not yet configured your Harmony remote.
- You've purchased both a Harmony hub‑based product as well as a Home Hub Extender. Don't have a Harmony Hub?
- Harmony is already up and running.
- Your TV, cable/satellite box and other entertainment devices are already working with Harmony.
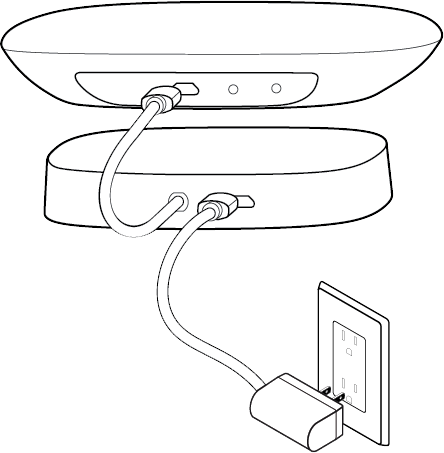
Harmony Home Hub Extender is designed to sit directly beneath the Harmony Hub.
- Place the Harmony Hub on top of the Home Hub Extender so the LED lights both face forward. Magnets will help guide the two products into place.
- Connect the short USB cable from the extender into the back of the hub.
- Lastly, connect the power cable into the Home Hub Extender and plug the adapter into the wall. Both LED lights should turn on.
Your new Harmony Home Hub Extender is designed to sit directly beneath your existing Harmony Hub.
- Disconnect the power cable from your existing hub.
- Place your existing hub on top of your new extender so the LED lights both face forward. Magnets will help guide the two products into place.
- Connect the short USB cable from the extender into the back of your existing hub.
- Lastly, connect the existing power cable into the Home Hub Extender. Both LED lights should turn on.
-
Visit the iTunes App Store or Google Play and search for the Harmony mobile app.


-
Launch the app and select Set Up New Hub.
-
Continue through the various screens following the instructions:
- Ensure Bluetooth is enabled on your iPhone.
- Ensure your phone is connected to your home's Wi‑Fi network.
- Ensure Harmony Hub is powered on.
- the Harmony mobile app should find the hub after several seconds.
Having trouble?Try disabling and re-enabling Bluetooth on your phone.
View our support article:
the Harmony mobile app is unable to discover Harmony Hub. -
Once your phone and hub have paired over Bluetooth you will be asked to enter your Wi‑Fi credentials.
-
If you already have a Harmony account, sign in.
Otherwise, select CREATE ACCOUNT.
-
You'll be guided through how Harmony works.
-
If you have a previous Harmony remote and want to import its devices and Activities, you'll be able to copy them over to your new Harmony. If you don't have a previous Harmony remote, select No, Set Up New.
-
Harmony will first try to detect Wi‑Fi connected devices such as Sonos, Roku and Philips hue. Additional devices not found over Wi‑Fi such as your stereo or DVD player will be at a later stage during setup.

You may now launch the Harmony mobile app available from the iTunes App Store or Google Play.
Harmony will automatically detect your Home Hub Extender and prompt you to pair your home control devices.
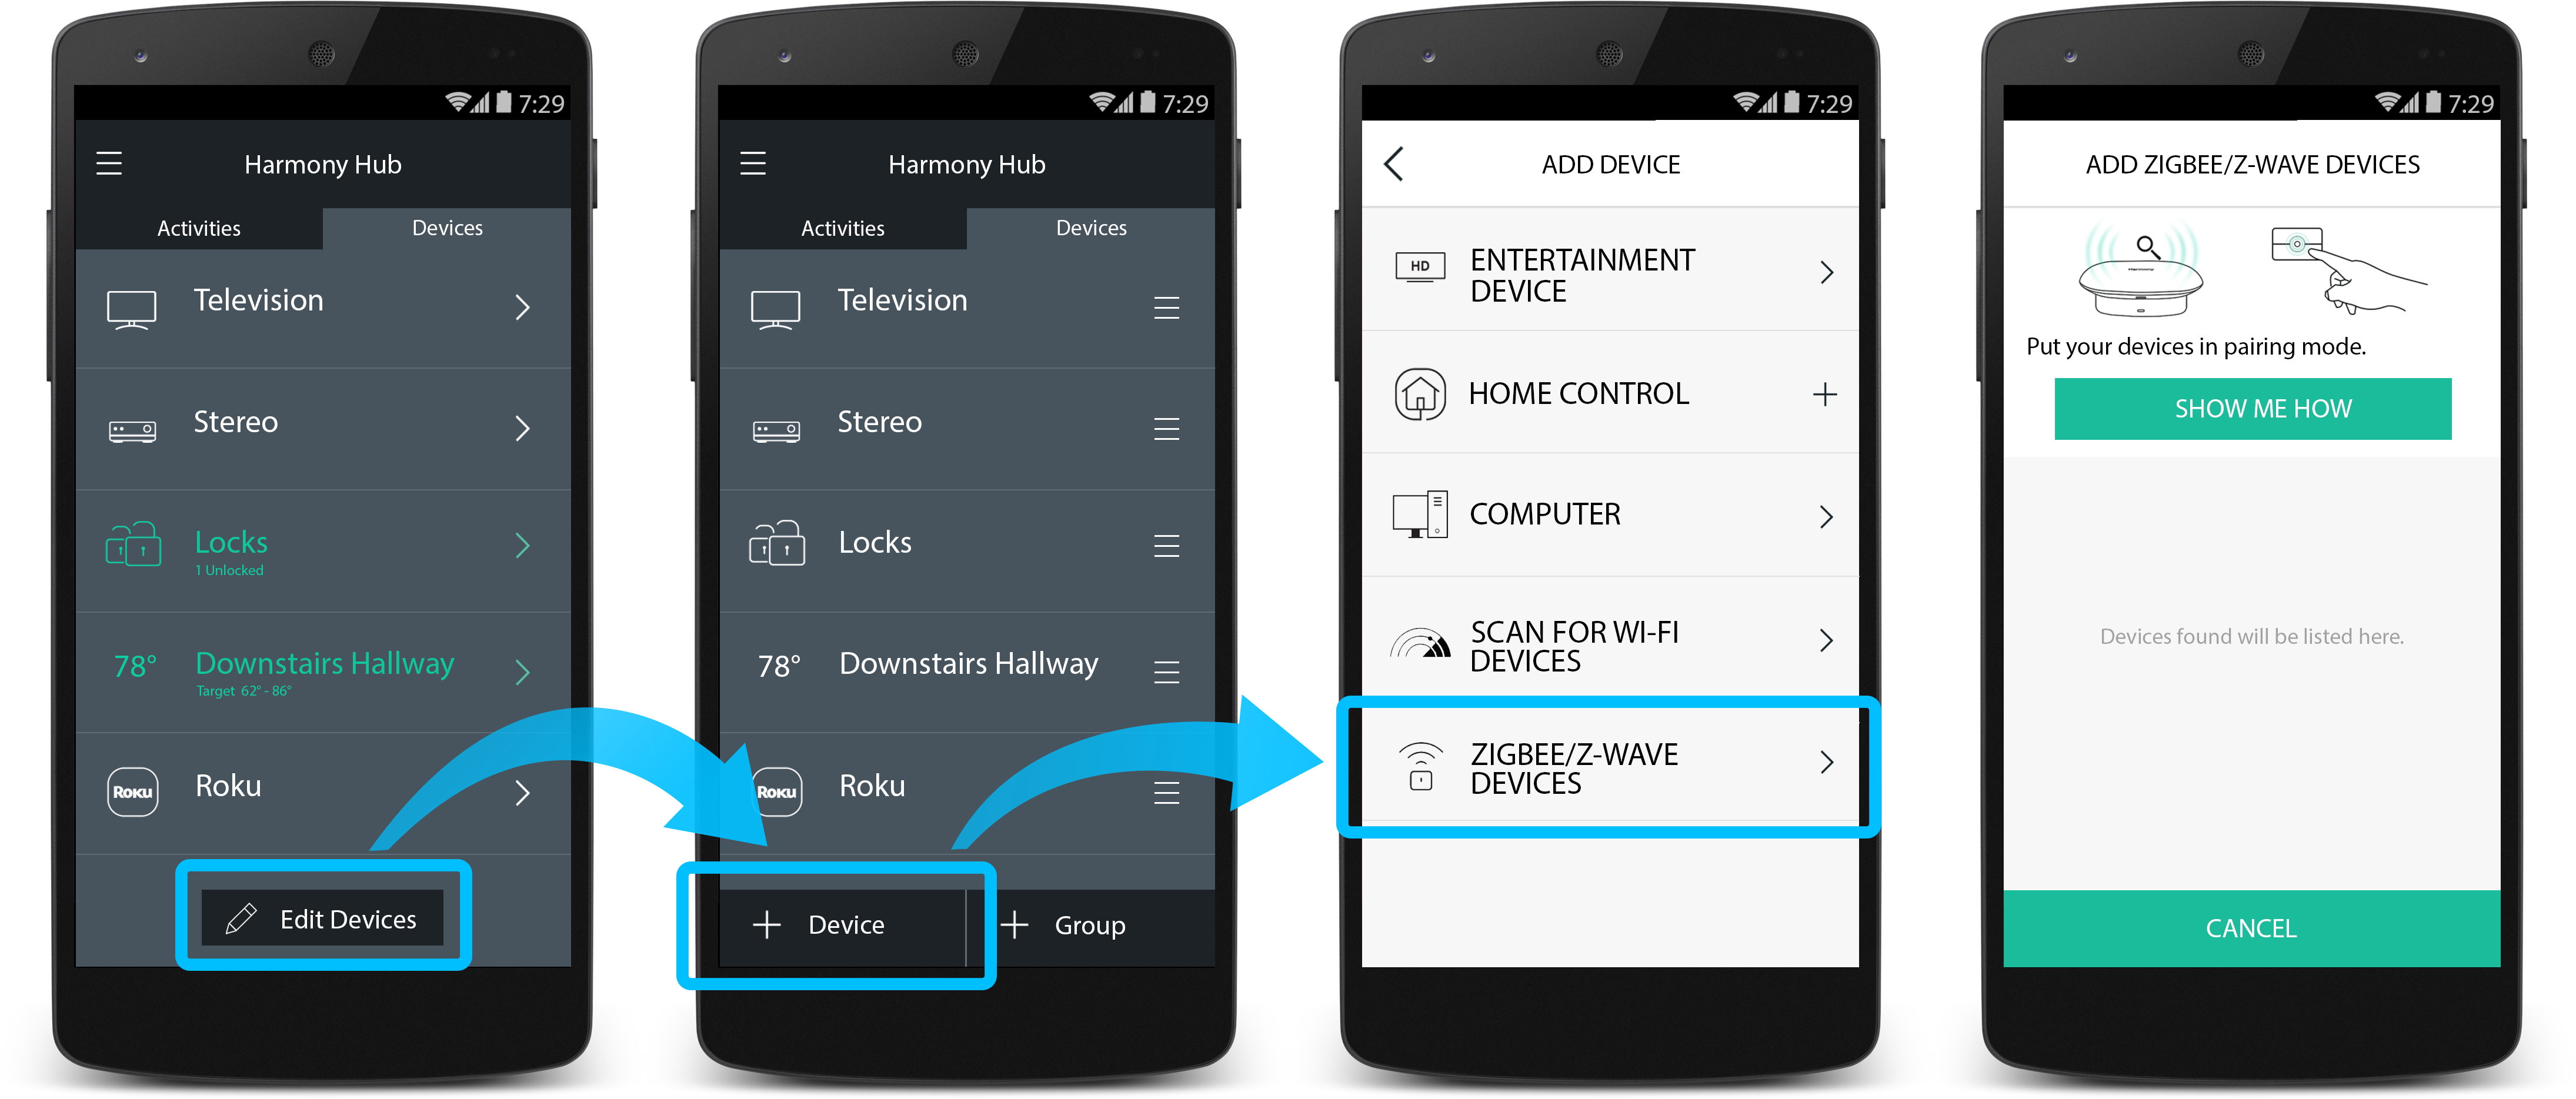
If you'd like to add new devices at a later time, navigate to Edit Devices > + Device > ZIGBEE/Z-WAVE DEVICES, as shown below:
Adding Home Control Devices
- You're adding lights, locks, sensors and/or plugs to your home for the first time.
- You don't currently have a home automation hub.
Get Started With Home Control
- You currently control lights, locks, sensors and/or plugs with the use of an existing home automation hub.
- Select your current home control solution:


- Or, do you have another Z-Wave or ZigBee network?
Getting Started With Home Control
Once Harmony is in pairing mode you must also initiate pairing on your device. As each device has different pairing instructions, SHOW ME HOW provides details.
-
Pair each of your home control devices. You may assign a name and an icon. Once all your home control devices are added, select DONE.
Having trouble?If your device was previously paired with another home automation hub, you may need to reset (or exclude) it before Harmony can pair.
We recommend skipping these home control devices until later.
Once you've added your other devices and generated Harmony Activities, search for any device that failed to add in our compatibility list, select ADDITIONAL HELP and follow the guidelines.
-
Harmony will now allow you to add additional home entertainment and home automation devices such as your telvision, stereo or DVD player.
- Press the Add Device button.
- If required, Harmony will ask for the username and password for your services so we may communicate with them.
- Having trouble finding your model number? This article may help: Finding your device's model number.
-
Harmony will either suggest several Activity types or automatically create Activities to help set up your one-touch experience. Select the home entertainment and home control devices you'd like involved. For example, if you want your lights to dim when starting Watch TV, be sure to select them as a device.

Once Harmony is in pairing mode you must also initiate pairing on your device. As each device has different pairing instructions, SHOW ME HOW provides details.
-
Pair each of your home control devices. You may assign a name and an icon. Once all your home control devices are added, select DONE.
Having trouble?If your device was previously paired with another home automation hub, you may need to reset (or exclude) it before Harmony can pair.
Search for this device in our compatibility list, select ADDITIONAL HELP and follow the guidelines.
-
Once added, you may now include these devices in new or existing Harmony Activities. Learn about the home control Activities you can create.
-
To join your Z-Wave network, select SHOW ME HOW.
-
Select JOIN EXISTING NETWORK and select your existing hub name. If your hub is not listed, select OTHER Z-WAVE NETWORK.
-
Harmony is now in joining mode and is waiting for your existing hub to send a join request.
Follow the steps typically used to add a new device to your other hub.
-
Hub will acknowledge a new device has been added. Return to the Harmony mobile app. It will take several minutes for Harmony to collect information about each device on your network and will take approximately 15 seconds for every device you have in your network.
Device missing?Only devices using Z-Wave will appear when joining your network. Zigbee devices will not appear here.
Battery powered devices such as motion sensors often enter a low power mode which prevents them from being detected.
If a device did not appear, select RE-SCAN and press the pairing button on that device. This is often found next to or inside the battery compartment.
You have now successfully joined the Z-Wave network.
-
Harmony will now allow you to add additional home entertainment and home automation devices such as your telvision, stereo or DVD player.
- Press the Add Device button.
- If required, Harmony will ask for the username and password for your services so we may communicate with them.
- Having trouble finding your model number? This article may help: Finding your device's model number.
-
Harmony will either automatically create Activities or guide you through creating them based on the devices discovered to help set up your one-touch experience. If you'd like to further modify any of these Activities by adding additional commands, please take a look at our article regarding adding commands to your Activities.
Creating Helpful Rules
Dinner Time. Get your family to the table more easily.
Turn off your TV and game consoles, then turn on the lights in your dining room and start music playing for dinnertime. Help get your family to the table more easily with the Harmony Dinner Time Activity.
This Activity requires:
- Music: Sonos, stereo or connected media player
- Lights: Either a Wi‑Fi enabled light bulb, or, a connected light switch
Creating your Dinner Time Activity
- Launch the Harmony mobile app and connect to your Harmony hub.
- Scroll to the bottom of the ACTIVITIES tab and select Edit, then Add Activity.
- Select Add your own Activity and name your Activity: Dinner Time.
- Select the device that's used to play your DINNER TIME Activity music.
- Select the device you use to control the volume.
- Select the input your sound system needs to be set to.

Configure your dining room lights to turn on
- When prompted with: "You can adjust your home control devices", select the NEXT > button.
- Select your dining room light switch or light bulbs and ensure the power button is enabled. Select NEXT >.
- When prompted to select the devices for use when this Activity ends, leave this list blank. Select NEXT >.
Selecting which music plays automatically
- Select the radio station or action that begins playing your music.
- For your start sequence, we suggest adding your favorite preset radio station if using your radio tuner, or adding Play for your CD-Player.
Learn More - That’s it! Now you can launch your Dinner Time Activity from the Harmony mobile app or Harmony remote.
Party! Entertain guests with music and lights.
Begin playing some background music and set your living and dining room lights to a warm, inviting glow. Spend more time with your guests, and let Harmony set the ambiance.
This Activity requires:
- Music: Sonos, stereo or connected media player
- Lights: Either a Wi‑Fi enabled light bulb, or, a connected light switch
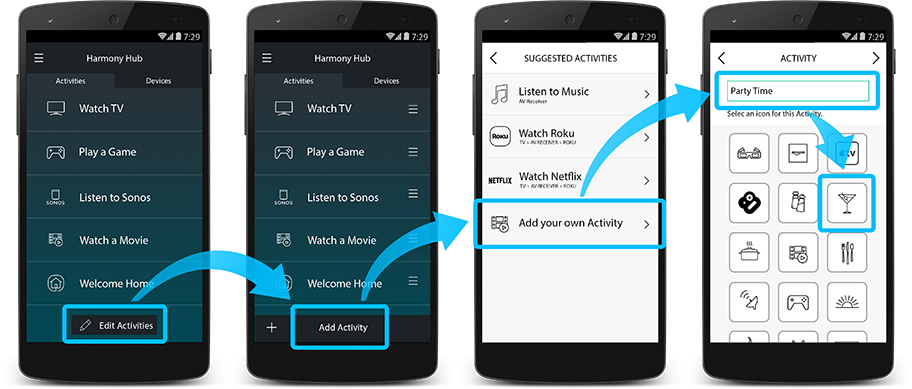
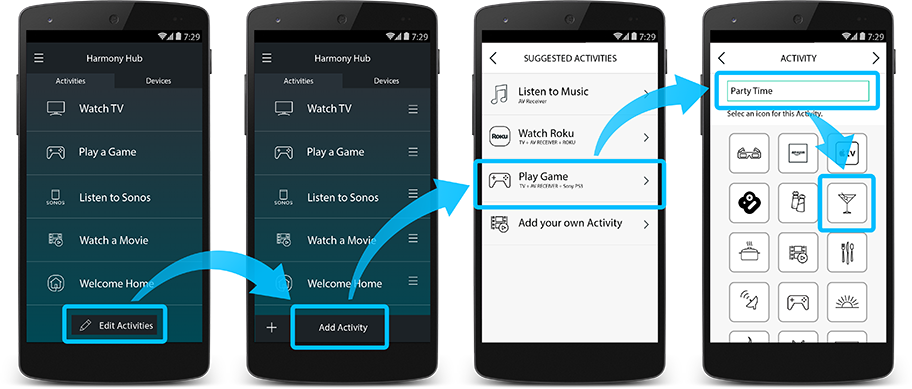
Creating your Party Time Activity
- Launch the Harmony mobile app and connect to your Harmony hub.
- Scroll to the bottom of the ACTIVITIES tab and select Edit, then Add Activity.
- Select Add your own Activity and name your Activity: Party Time.
- Select the device that's used to play your Party Time Activity music.
- Select the device you use to control the volume.
- Select the input your sound system needs to be set to.
Configure your living and dining room lights to turn on
- When prompted with: "You can adjust your home control devices", select the NEXT > button.
- Select your living and dining room light switches or light bulbs and ensure the power button is enabled. Select NEXT >.
- When prompted to select the devices for use when this Activity ends, leave this list blank. Select NEXT >.
Selecting which music plays automatically
- Select the radio station or action that begins playing your music.
- For your start sequence, we suggest adding your favorite preset radio station if using your radio tuner, or adding Play for your CD-Player.
Learn More - That’s it! Now you can launch your Party Time Activity from the Harmony mobile app or Harmony remote.
Goodnight. Keep the nightlight on for 30 minutes.
Play some soothing music with the lights dimmed, then power everything off after 30 minutes. Harmony can help keep the monsters at bay while your children fall asleep.
This Activity requires:
- Music: Sonos, stereo or connected media player
- Lights: Either a Wi‑Fi enabled light bulb, or, a connected light switch
Creating your Good Night Activity
- Launch the Harmony mobile app and connect to your Harmony hub.
- Scroll to the bottom of the ACTIVITIES tab and select Edit, then Add Activity.
- Select Add your own Activity and name your Activity: Goodnight.
- Select the device that's used to play your Godonight Activity music.
- Select the device you use to control the volume.
- Select the input your sound system needs to be set to.

Configure the lights in your bedroom to turn on
- When prompted with: "You can adjust your home control devices", select the NEXT > button.
- Select your bedroom light switches or light bulbs and ensure the power button is enabled. Select NEXT >.
- When prompted to select the devices for use when this Activity ends, leave this list blank. Select NEXT >.
Selecting which music plays automatically
- Select the radio station or action that begins playing your music.
- For your start sequence, we suggest adding your favorite preset radio station if using your radio tuner, or adding Play for your CD-Player.
Learn More
Setting your sleep timer
- When you're ready for bed, launch the Goodnight Activity from the Harmony mobile app or Harmony remote.
- Then, select MENU > Sleep Timer. Harmony will power off your lights and music after the selected duration.
Good morning. Wake up with warm colored lights and your favorite tunes.
Automatically brighten your bedroom lights and begin playing your morning soundtrack every weekday morning at 7AM. With Harmony, your days don’t have to begin with that alarm clock buzz.
This Activity requires:
- Music: Sonos, stereo or connected media player
- Lights: Either a Wi‑Fi enabled light bulb, or, a connected light switch
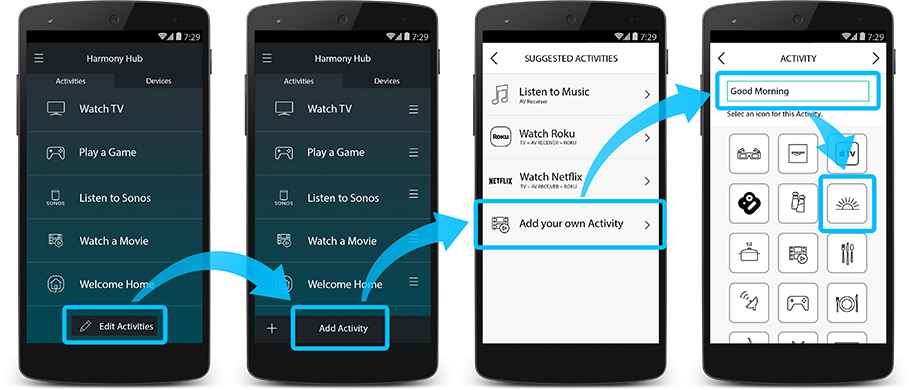
Creating your Good Morning Activity
- Launch the Harmony mobile app and connect to your Harmony hub.
- Scroll to the bottom of the ACTIVITIES tab and select Edit, then Add Activity.
- Select Add your own Activity and name your Activity: Good Morning.
- Select the device that's used to play your Good Morning Activity music.
- Select the device you use to control the volume.
- Select the input your sound system needs to be set to.
Configure your bedroom and kitchen lights to turn on
- When prompted with: "You can adjust your home control devices", select the NEXT > button.
- Select your living and dining room light switches or light bulbs and ensure the power button is enabled. Select NEXT >.
- When prompted to select the devices for use when this Activity ends, leave this list blank. Select NEXT >.
Selecting which music plays automatically
- Select the radio station or action that begins playing your music.
- For your start sequence, we suggest adding your favorite preset radio station if using your radio tuner, or adding Play for your CD-Player.
Learn More - That’s it! Now you can launch your Good Morning Activity from the Harmony mobile app or Harmony remote.
Create an epic Play Game Activity
Power on your game console, turn up the bass on your stereo, dim the overhead lights and set some bulbs to your gaming colors. Immerse yourself into the adventure. Are you up to the challenge?
This Activity requires:
- TV
- Game Console
- Lights: Colored light bulbs
Creating your Play Game Activity
- Launch the Harmony mobile app and connect to your Harmony hub.
- Scroll to the bottom of the ACTIVITIES tab and select Edit, then Add Activity.
- Select Play Game and name your Activity: Play Game.
- Select the device that's used to play your Play Game Activity music.
- Select the device you use to control the volume.
- Select the input your sound system needs to be set to.
Configure your lights for gaming
- When prompted with: "You can adjust your home control devices", select the NEXT > button.
- Select your living and dining room light switches or light bulbs and ensure the power button is enabled. Select NEXT >.
- When prompted to select the devices for use when this Activity ends, leave this list blank. Select NEXT >.
- That’s it! Now you can launch your Play Game Activity from the Harmony mobile app or Harmony remote.
Christmas time with music and lights
Turn on your Christmas tree lights, begin playing some festive music and set your living room lights red and green. Spend more time with your guests, and let Harmony set the spirit of Christmas.
This Activity requires:
- Music: Sonos, stereo or connected media player
- Lights: Colored light bulbs
- Plug: Appliance module to control your tree lights
Creating your Christmas Time Activity
- Launch the Harmony mobile app and connect to your Harmony hub.
- Scroll to the bottom of the ACTIVITIES tab and select Edit, then Add Activity.
- Select Add your own Activity and name your Activity: Christmas Time.
- Select the device that's used to play your Christmas Time Activity music.
- Select the device you use to control the volume.
- Select the input your sound system needs to be set to.

Turn on your tree lights and living room lights
- When prompted with: "You can adjust your home control devices", select the NEXT > button.
- Select the plug for which your Christmas tree lights are plugged into and ensure it's set to power on.
- Also include the living room light switches or light bulbs and configure them to turn green and red. Select NEXT >.
- When prompted to select the devices for use when this Activity ends, leave this list blank. Select NEXT >.
- That’s it! Now you can launch your Christmas Time Activity from the Harmony mobile app or Harmony remote.
Additional support resources
Troubleshooting
- Wi‑Fi won't connect or frequently disconnects from the Hub Harmony Hub connects to with your home's Wi‑Fi network so it may communicate with the Harmony mobile app, sync with the ...
- Compatibility ZigBee and Z-Wave products View a list of compatibile motion sensors, light switches, door locks and other devices.
- See all articles →
Have more questions or suggestions?
Download the setup software
Depending on your remote, you can set up and configure Harmony using either the Harmony software or Harmony mobile app for iOS and Android.
DownloadHarmony community forums
Post a question to the Harmony forums. Our Harmony product managers also actively participate and provide technical advise.
ExploreContact the Harmony Team
Harmony comes with a period of free email and phone support. You also have unlimited access to our online support community.
Contact Us Dutch
Dutch English
 French
 German
 Italian
 Spanish