How to add and control a multi-zone device
If you have a device that offers multi‑zone functionality, you can use your Harmony hub‑based remote to create a multi-room experience. For example, if you're having a party, you can use your Harmony remote to enable additional zones on your receiver that night and play music throughout your entire house.
Harmony multi‑zone
Each zone is controlled by its own set of commands in order to avoid content from one zone interfering with content being played in another. To accomplish this, each zone must be added as a separate device on your Harmony account.
Adding your device and first zone
- Select MENU, then Harmony Setup > Add/Edit Devices & Activities > DEVICES.
- Select ADD DEVICE at the bottom, select ENTERTAINMENT DEVICE and enter manufacturer and model number of your device.
- Harmony may present you with an additional notification based on the device being entered, or it may add the device without any prompt if everything is ok.
- Once added, the Harmony app will guide you through checking this device to ensure it can be properly controlled.
- This device will control your first zone.
- Launch the MyHarmony desktop software and select your remote from the Remote Gallery.
- Next, select the Devices tab, followed by Add device.
- Enter the manufacturer and device model number.
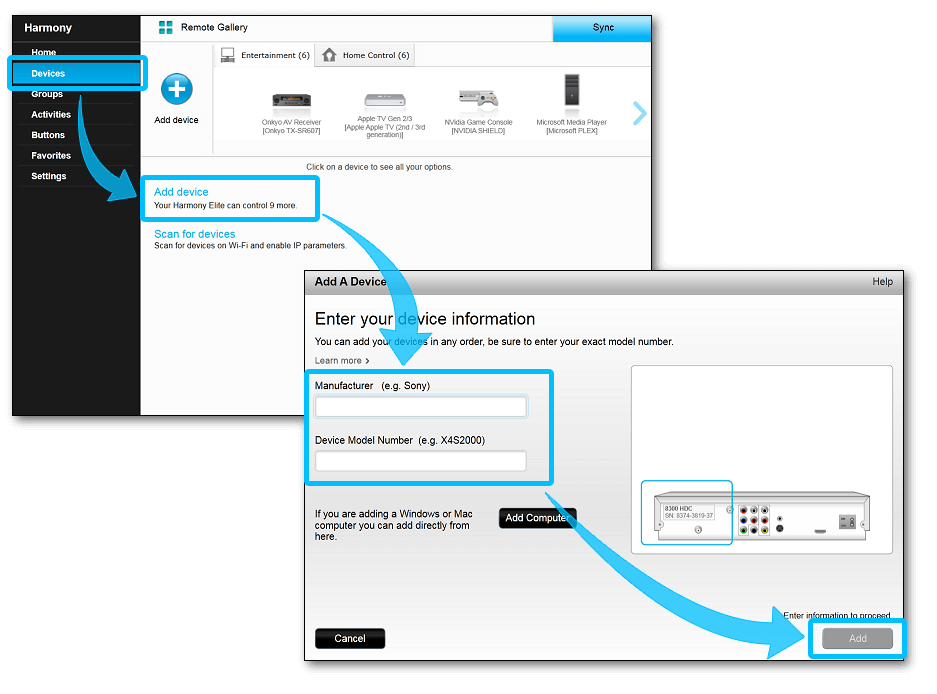
- Harmony may present you with an additional notification based on the device being entered, or it may add the device without any prompt if everything is ok.
- Once added, the Harmony app will guide you through checking this device to ensure it can be properly controlled.
- This will be your first zone.
Adding additional zones to your device
- Select MENU, then Harmony Setup > Add/Edit Devices & Activities > DEVICES.
- Select ADD DEVICE at the bottom, select ENTERTAINMENT DEVICE.
- Enter the same manufacturer and model number, this time adding “(Zone #)” at the end of the model number. For example:
Adding the 2nd zone:
Manufacturer Name: Denon
Model Number: AVR-3805 (Zone 2)
or
Adding the 3rd zone:
Manufacturer Name: Denon
Model Number: AVR-3805 (Zone 3)
- Finish adding this device in a similar way to the first zone.
- This device will control your second zone.
- Repeat these steps to control additional zones, increasing the number of the zone each time for each available zone supported by your device.
To correctly use different zones simultaneously you must create an Activity for each zone. For example, zone 1 could be part of your Watch TV Activity in the living room, while zone 2 is a Listen to Music Activity on the patio. For both to work at the same time and without turning off devices in an Activity when switching back and forth between them, you must adjust your device’s power settings.
- Launch the MyHarmony desktop software and select your remote from the Remote Gallery.
- Next, select the Devices tab, followed by Add device.
- Enter the manufacturer and device model number.
- Enter the same manufacturer and model number, this time adding “(Zone #)” at the end of the model number. For example:
Adding the 2nd zone:
Manufacturer Name: Denon
Model Number: AVR-3805 (Zone 2)
or
Adding the 3rd zone:
Manufacturer Name: Denon
Model Number: AVR-3805 (Zone 3)
- Finish adding this device in a similar way to the first zone.
- This device will control your second zone.
- Repeat these steps to control additional zones, increasing the number of the zone each time for each available zone supported by your device.
To correctly use different zones simultaneously you must create an Activity for each zone. For example, zone 1 could be part of your Watch TV Activity in the living room, while zone 2 is a Listen to Music Activity on the patio. For both to work at the same time and without turning off devices in an Activity when switching back and forth between them, you must adjust your device’s power settings.
Adjusting your power settings
When switching between Activities, Harmony, by default, will automatically turn off any devices that are not associated with the newly selected Activity. For example, when switching from your Watch TV Activity to your Listen to Music Activity, Harmony will power off the devices that are not used by both Activities (in this example, the television and set top box would power off).
To run more than one Activity at a time it is necessary to change your devices power settings to remain powered on when switching between Activities. Configuring devices to remain on when switching between Activities will avoid unwanted power offs so that, as an example, both the Watch TV Activity (in the living room) and Listen to Music Activity (on the patio) can run and be controlled simultaneously.
Please follow the steps below for each of the zones you have added to your MyHarmony account:
- Select MENU, then Harmony Setup > Add/Edit Devices & Activities > DEVICES.
- Select the device (Zone) you wish to edit and select POWER SETTINGS.
- Select KEEP DEVICE ALWAYS ON, BUT SWITCH OFF WHEN OFF BUTTON IS PRESSED, then press > in the upper right-hand corner.
- On the How do you turn your [device name] ON and OFF screen, press > to continue and keep your current settings.
- On the Power Settings screen, select POWER ON
- Select the power command to open the list of available commands. If a command called "Main Zone On" is present, select it. If no such command is present, use the < arrow return to the previous screen, and keep the default power command.
- Repeat the same steps for POWER OFF, searching for and selecting the ‘Main Zone Off’ command, if available.
Your AV receiver, Zone 2 (and/or other Zones) are now configured successfully. You can now operate Activities for your additional zones simultaneously.
When switching between Activities, Harmony, by default, will automatically turn off any devices that are not associated with the newly selected Activity. For example, when switching from your Watch TV Activity to your Listen to Music Activity, Harmony will power off the devices that are not used by both Activities (in this example, the television and set top box would power off).
To run more than one Activity at a time it is necessary to change your devices power settings to remain powered on when switching between Activities. Configuring devices to remain on when switching between Activities will avoid unwanted power offs so that, as an example, both the Watch TV Activity (in the living room) and Listen to Music Activity (on the patio) can run and be controlled simultaneously.
Please follow the steps below for each of the zones you have added to your MyHarmony account:
- Sign into the MyHarmony desktop software and select your remote from the Remote Gallery.
- Select the Devices tab, along with the (Zone) you'd like to modify the power settings for.
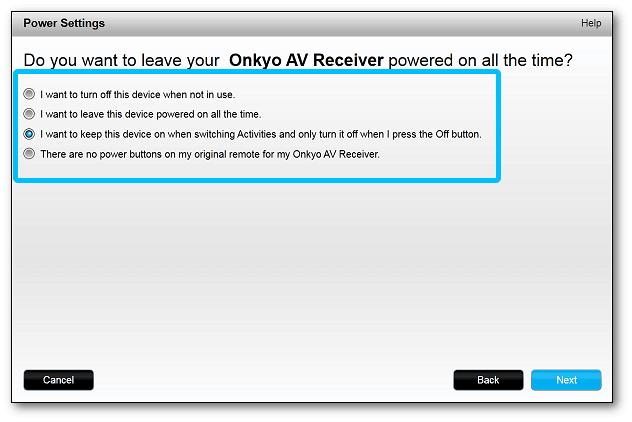
- Select Change Device Settings, followed by Power Settings, then Next.
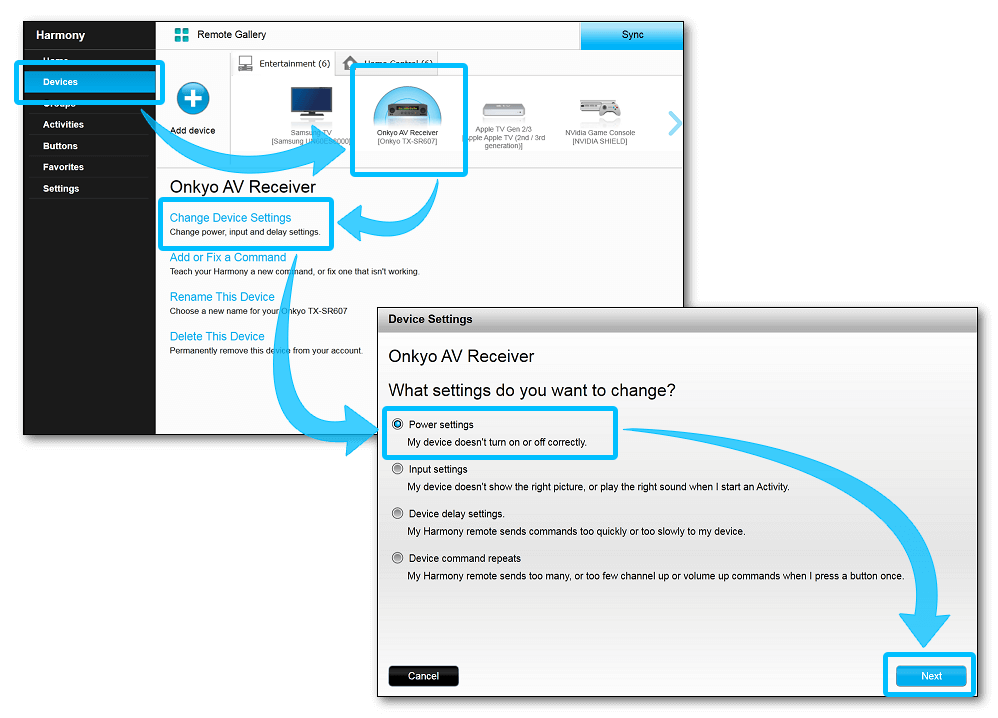
- Select I want to keep this device on when switching Activities and only turn it off when I press the Off button.
- Remember to sync your remote whenever making changes.
Additional information
In review, you want to:
- Add each zone as a separate device from the main AVR (Zone 2, Zone 3, etc.).
- Change the power settings of all devices to stay on unless OFF button is pressed.
- Create an Activity for each zone (if zone 2 is for listening to music on the patio, create an Activity for it).
Sample zone names:
- Zone 1
- Zone 2
- Zone 3
- AVR Patio
- AVR Basement
- AVR Den
- AVR Pool/Spa