Harmony experience with Windows
It's compatible with Harmony hub‑based products

Setup
After adding Windows as a device, you'll need to create a Watch PC Activity and configure it to control Windows with your Harmony remote. You'll also need to make some additional changes, which are discussed in this section, to fully control Windows with Harmony.
- Add Windows to Harmony
- When adding Windows, Harmony will ask you for the manufacturer and model numbers of your television, AV receiver, and other devices that will be included in your Watch PC Activity.
- Configure your Windows Activity
- Configure your Activity, allowing it to open, close and control a Windows program using your Harmony remote.
When starting your PC Activity for the first time, you must use the Harmony app
Add Windows to your Harmony setup
- Launch the Harmony app.
- Select MENU, then Harmony Setup > Add/Edit Devices & Activities > DEVICES.
- Select the ADD DEVICE button at the bottom of the screen.
- Select COMPUTER and enter OS WINDOWS, select > in the upper right-hand corner.
Setting up an Activity
- Once added, Harmony will prompt you to create an Activity. Select YES.
- Continue through the process of including devices and selecting your inputs, followed by > in the upper right-hand corner.
- You'll be prompted to Bluetooth pair with Windows. If you're using an IR receiver, select SKIP at the bottom of the screen.
Configuring a Windows shortcut
- On your PC, create a shortcut to any program you'll like to launch with Harmony and right click it.
- Select Properties and click the Shortcut key field, setting it to Ctrl+Alt+1, Ctrl+Alt+2 or Ctrl+Alt+3.
- Add a step at the start of your Windows Activity, selecting the keyboard shortcut for Windows as the new command.
- You can configure closing Windows with Harmony by customizing a button on your remote to do so (Quit).
- Once complete, remember to sync your remote.
- Sign into the MyHarmony desktop software and select your remote from the gallery.
- Select the Devices tab, followed by Add device.
- Select Add Computer, click the Microsoft Windows radio button, then Add.
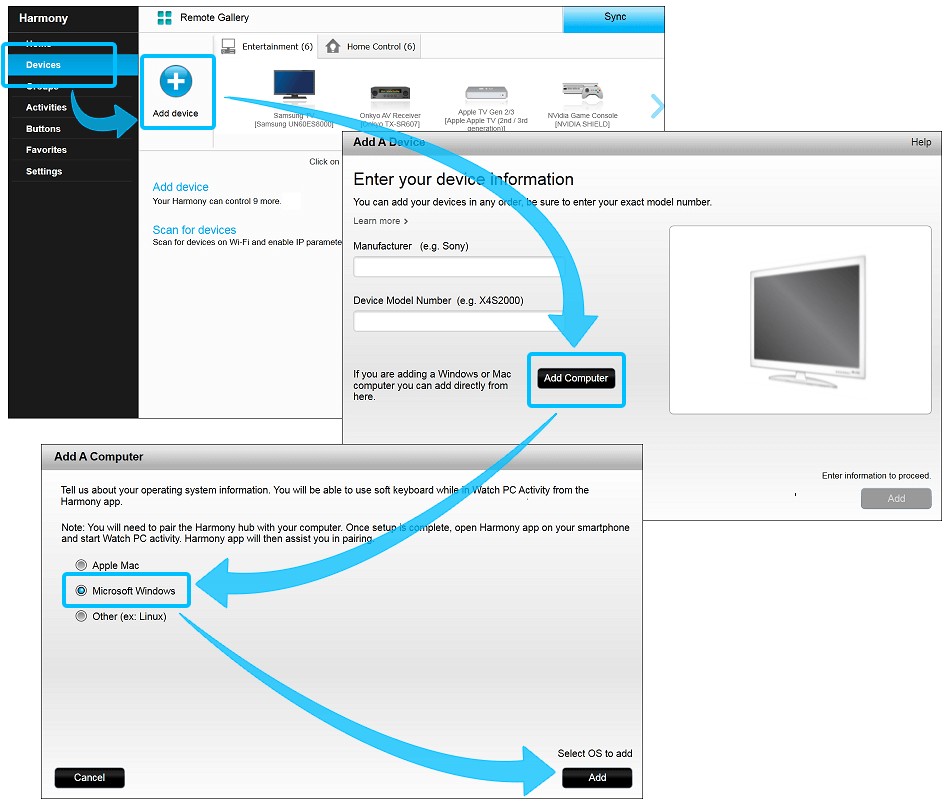
Setting up an Activity
- Sign into the MyHarmony desktop software and select your remote from the gallery.
- Select the Activities tab on the left and click Add Activity.
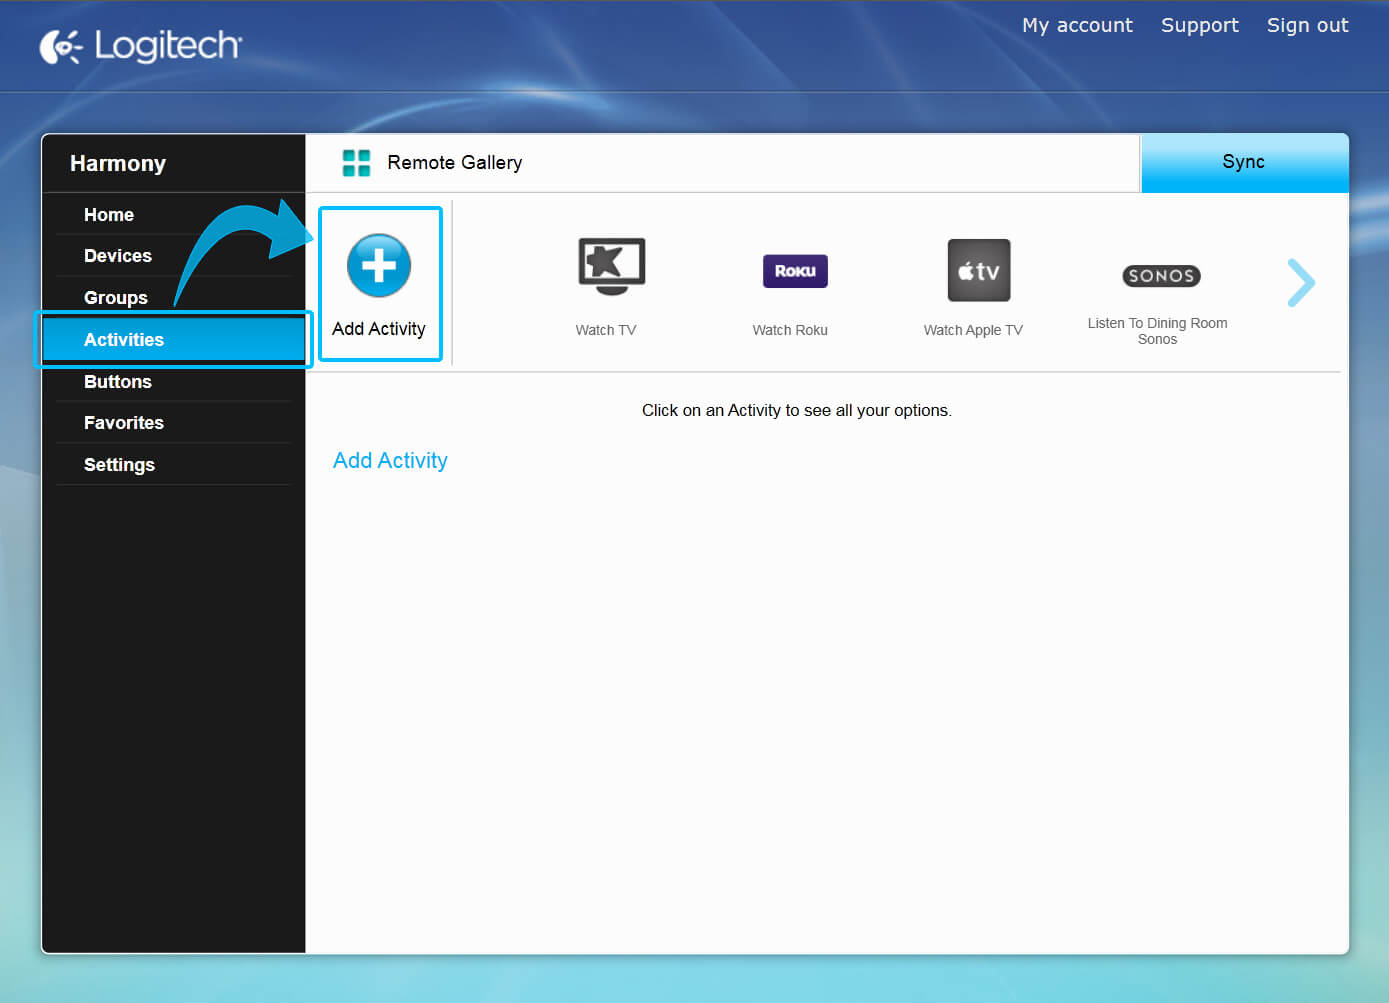
- Select Activity type Watch PC and click Next.
- You'll be guided through naming your Activity and configuring included devices.
Configuring a Windows shortcut
- Once complete, you'll need to configure a shortcut on Windows for the program you'd like to launch using Harmony.
(e.g., VLC Player) - On your PC, create a shortcut to any program you'll like to launch with Harmony and right click it.
- Select Properties and click the Shortcut key field, setting it to Ctrl+Alt+1, Ctrl+Alt+2 or Ctrl+Alt+3.
- Add a step at the start of your Windows Activity, selecting the keyboard shortcut for Windows as the new command.
- You can configure closing Windows with Harmony by customizing a button on your remote to do so (Quit).
- Once complete, remember to sync your remote.
Control
Harmony Smart Keyboard can act as a fully functional Windows PC keyboard, many apps will also allow you to use your mobile device for control functions. Listed below are some popular Windows apps and ways to control them using Harmony.
For Windows 8 users, Harmony Smart Keyboard also supports swipe and tab actions.
Learn more
Windows
Direction Pad Navigation will navigate Windows.
Media keys such as Play, Pause, Stop, Previous Chapter, Next Chapter, Fast-Forward and Rewind commands work. TV keys such as Channel Up, Channel Down commands work. Windows allows you to skip 30 seconds forward or back using the direction left and right arrows.
With Harmony Smart Keyboard
Text entry is possible using Harmony Smart Keyboard or the Harmony app
Mouse/Cursor control is possible using Harmony Smart Keyboard.
Learn more about Windows keyboard shortcuts.
Netflix
All Harmony products
Direction Pad Navigation will navigate Netflix.
Media Keys such as play, pause and fast forward do not control Netflix.
With Harmony Smart Keyboard
Text entry is possible using Harmony Smart Keyboard or the Harmony app
Mouse/Cursor control is possible using Harmony Smart Keyboard.
Netflix offers these keyboard shortcuts:
-
SpacebarToggle Play/Pause
-
Left arrowSkip backward 10 seconds
-
Right arrowSkip forward 10 seconds
-
Shift + left arrowRewind
-
Shift + right arrowFast-Forward
-
FEnter full-screen
-
EscExit full-screen
Hulu
All Harmony products
Direction Pad Navigation will navigate Hulu.
Media Keys such as play, pause and fast forward do not control Hulu.
With Harmony Smart Keyboard
Text entry is possible using Harmony Smart Keyboard or the Harmony app
Mouse/Cursor control is possible using Harmony Smart Keyboard.
Hulu offers these keyboard shortcuts:
-
SpacebarToggle Play/Pause
-
Left arrowSkip backward 10 seconds
-
Right arrowSkip forward 10 seconds
-
EscExit full-screen
YouTube
All Harmony products
Direction Pad Navigation will navigate the YouTube app.
Media Keys such as Play, Pause, Stop, Fast-Forward and Rewind commands work. YouTube allows you to navigate between videos using the Skip Forward and Skip backward commands.
With Harmony Smart Keyboard
The YouTube app has an on screen keyboard you navigate using direction keys and does not accept keyboard text entry.
Amazon
Direction Pad Navigation will navigate the Amazon app.
Media Keys such as Play, Pause, Stop, Fast-Forward and Rewind commands work. Amazon allows you to move a frame forward or backward using the direction left and right arrows.
With Harmony Smart Keyboard
Text entry is possible using Harmony Smart Keyboard or the Harmony app
Mouse/Cursor control is possible using Harmony Smart Keyboard.
Browser
Direction Pad Navigation will navigate the Browser app.
Media Keys are not used within the Browser app.
Text entry is possible using Harmony Smart Keyboard or Harmony app.
Mouse/Cursor control is possible using Harmony Smart Keyboard.
Other apps
The behavior of other apps may vary depending on its design.
FAQs
I need help establishing a Bluetooth connection with Windows
If you're not familiar with adding Bluetooth enabled devices to Windows, follow the steps below to get started.
Before you begin
Before you can add a Bluetooth enabled device to your computer, you must do two things to make sure your computer and the device are ready to connect:
- Add a Bluetooth adapter to your computer if it doesn't already have one. You can do this by plugging the adapter into a USB port.
Some computers come with a built-in Bluetooth adapter, especially laptops. You might have to turn on the adapter, or use a switch on your laptop to turn it on if your laptop has one. This might not be called a Bluetooth switch. It might be called a wireless switch, or something similar. If you are unsure about how to turn on the Bluetooth adapter or whether your computer has a built-in Bluetooth adapter, check the manual for your computer or the manufacturer's website.
- Set up the Bluetooth enabled device so that your computer can find it.
To do this, you must first:
- Turn the device on.
- Make it discoverable.
When a Bluetooth enabled device is in discovery mode, it broadcasts a wireless signal that allows it to be detected by other devices or computers. This is sometimes called pairing mode. When most devices are discoverable, they are also in pairing mode, ready to be paired with your computer.
To learn how to make a device discoverable, check the information that came with your device or go to the manufacturer’s website. Methods for making a device discoverable can vary widely from one type of device to the next. Some Bluetooth enabled devices are always in discovery mode. Others, such as most mobile phones, need to be placed in discovery mode by selecting discovery from a software menu or pressing a button on the device. Discovery buttons can be very small and hard to spot, often placed on the bottom of a mouse, keyboard, or similar device. The button may be labeled with the word "connect," or another similar term (e.g., a Bluetooth logo or it may not be labeled at all).

To add a Bluetooth enabled device
Once you've verified that a Bluetooth adapter is installed on your computer, and the device you want to connect with is discoverable, you can add most Bluetooth enabled devices to your computer. Here's how:
- Open Devices and Printers by clicking the Start button, then clicking Devices and Printers.
- Click Add a device, and then follow the instructions.
- Click the Bluetooth enabled device you want to add to your computer, and then click Next. If you don't see the device you want to add, make sure the device is turned on and discoverable. If you just turned on the device, it may take Windows several seconds for Windows to detect it.
Windows might ask you to enter a pairing code (sometimes called a PIN or passcode). Most Bluetooth enabled devices need to be paired with your computer before they can exchange information with each other. To do this, they must exchange protected pairing codes. This means that only the wireless devices you authorize can connect to your computer.
I need help establishing an infrared (IR) connection with Windows
When adding an IR dongle to your computer, use the software included with your purchase (if applicable) to assist with your setup and in adding device drivers. When dealing with plug and play devices, or a device that's not being detected after installing included software, follow the steps below to further troubleshoot your device:
- On you computer, click the Start button and right click Computer.
- Select Manage, followed by the Device Manager tab.
- Double-click Infrared devices (devices are listed alphabetically) and select Enable.
For more information about how Windows integrates with Bluetooth and infrared (IR) devices, please see Microsoft Support.
How Harmony integrates Windows
Harmony Smart Keyboard
If your computer supports Bluetooth Harmony Hub may pair and control Windows in this means. If your computer does not support Bluetooth, the Harmony Smart Keyboard USB receiver may be used as a connection between Harmony Hub and Windows.
You will be asked to select your control method and pair (if required) during set up using the Harmony app
Select your remote
We need to know which type of remote you have in order to provide you the correct instructions. Please select from one of the options below in order to get started.
Incompatible Remote
Instructions on this page are not relevant for the Harmony remote you've selected.
← GO BACK
 Dutch
Dutch English
 French
 German
 Italian
 Spanish